Are you looking for ‘how to connect Brother printer to computer‘? If yes, then you are at the right place. Connecting your Brother printer to your computer is a straightforward process. Once you read the blog, you will learn everything about connecting and setting up the printer.
Brother is a prominent brand that provides different printers. Many users rely on this printer for its versatile nature and excellent workflow. To connect the printer to a computer, you can use wired or wireless. Read here to learn all the methods.
Add Brother Printer to Computer: 4 Different Methods
Before you start, how to connect Brother printer to computer? First, you have to unbox the printer and gather all the essentials like USB cord, ink cartridges, toner, etc. Now, you are ready to add a printer to your computer using various methods. To do so, follow the below methods:
Method 1: Using a USB Cord
The first method comes under the wired connection via a USB cable. Go through the below steps to connect your printer to a computer:
- First, turn off your printer, then go to the Brother Support page, enter your printer model number, and download and install the printer driver.
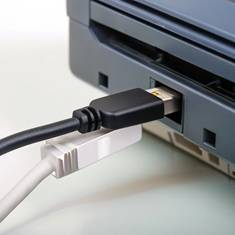
- Now, take your USB cord and connect it to the printer’s port and the other end to the computer’s USB port.
- After that, press the power button to turn on your device.
- Load the paper and check if the connection is complete by printing a test page.
Method 2: With a Wi-Fi Network
If you want to connect your device wirelessly, then you can use this method. To do so, follow the below steps:
- To begin, visit the official Brother printer site to download and install Brother printer drivers and other software.
- Next, turn on your printer, go to the home screen, and choose the Settings option.
- After that, click the Wi-Fi option and check if the Wi-Fi LED is blinking or not.
- From the list of available printers, choose your printer model to continue with the connection.
- Then, choose your network SSID and tap the OK button to continue.
- Enter your password, wait a few moments, and allow your printer to connect to Wi-Fi. When the connection is established, the LED light will stop flashing.
Method 3: Through an Ethernet Cable
If you are wondering about an easy method and your printer does not support a USB connection, you can use this method. Follow the below steps to learn how to connect Brother printer to computer easily using an Ethernet cable:
- First, navigate to the official Brother website and get the printer driver on your system.
- Then, take an Ethernet cable of the appropriate length.
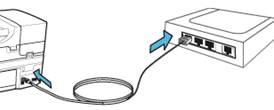
- After that, plug the one end into your printer’s port.
- Now, connect the other end to the Wi-Fi’s Ethernet port.
- Your printer will connect to your computer, and lastly, you can proceed with your printing tasks.
Method 4: Using a WPS PIN Code
In this method, you will need to enter the Personal Identification Number, which is created by your device. To do so, follow the below instructions:
- To start, visit https://setup.brother.com/ Brother’s official website and download printer drivers.
- Then, switch on your printer, go to Settings, and tap the Wi-Fi icon.
- After that, select your WPS PIN, which is generated when you enable the WPS option on your router. It can be found on the WPS setup page.
- Note down the WPS PIN and supply it when needed on your WPS settings page.
- Next, refer to your router’s manual to check the WPS configuration.
- Finally, your printer will connect to your computer, and you will be ready to start your print tasks with your printer.
Resolve Common Brother Printer Connection Errors
After trying all the ways to connect your printer to your computer. You can face some common errors that you can try if you are having issues connecting your printer to your computer:
- Make sure that your printer is plugged into a functioning power outlet.
- If you are connecting to a wireless connection, make sure both devices are on the same network.
- If the USB cord is damaged, replace it and securely connect both ends.
Summary
You have finished reading the blog and learned how to connect Brother printer to computer. Establishing the connection is easy with the methods mentioned above, whether you choose a wired or wireless option. In summary, connecting your printer to a computer is quick and easy through USB or Wi-Fi, providing seamless printing options. Now, you have the choice of which method is easiest for you to use and which method will easily resolve the issue.
Frequently Asked Questions (FAQs)
How Do You Connect a Brother Printer to a Mac?
If you have to connect your printer to a Mac, follow the below methods:
- Open your Mac and select System Settings or System Preferences from the Apple menu.
- Then, choose the Printers and Scanners option.
- After that, click the + icon to add your printer.
- From the list of available printers, select the printer.
- You will get a pop-up to choose your printer model number and the SSID network. Continue with the on-screen instructions to complete the setup process.
Why Is My Brother Printer Not Connecting to My Computer?
When you are trying to connect your printer to a computer, and it is not connecting, there could be several reasons behind it. If you are using a wired method, which is connecting your device with the help of a USB cable, then make sure it is not damaged and disconnect it from both ends. If you are using the wireless method, then make sure you have entered the correct password and that your device is connected to your network.
What Should You Do if Brother Printer Is Not Connecting to Computer?
If your printer is not connecting to the computer, you can try the following general steps to solve the problem:
- Disconnect your printer from the power source and restart it.
- Make sure the cable is properly connected to the printer and computer, and if you are using the wireless method, then enter the correct password.
- Remove and install the latest printer driver for your printer.